We bought a 2012 Casita Liberty Deluxe in late 2019 and took a month long trip to Arizona in 2020 just before the Corona Virus pandemic hit. Though I like my Casita, it has some annoying and aggravating limitations related to size that you must adapt to. Related to this is the most serous shortcoming of all that leaves no one satisfied. The beds. There are 2 problems here. One is INCONVENIENCE. The other is COMFORT.
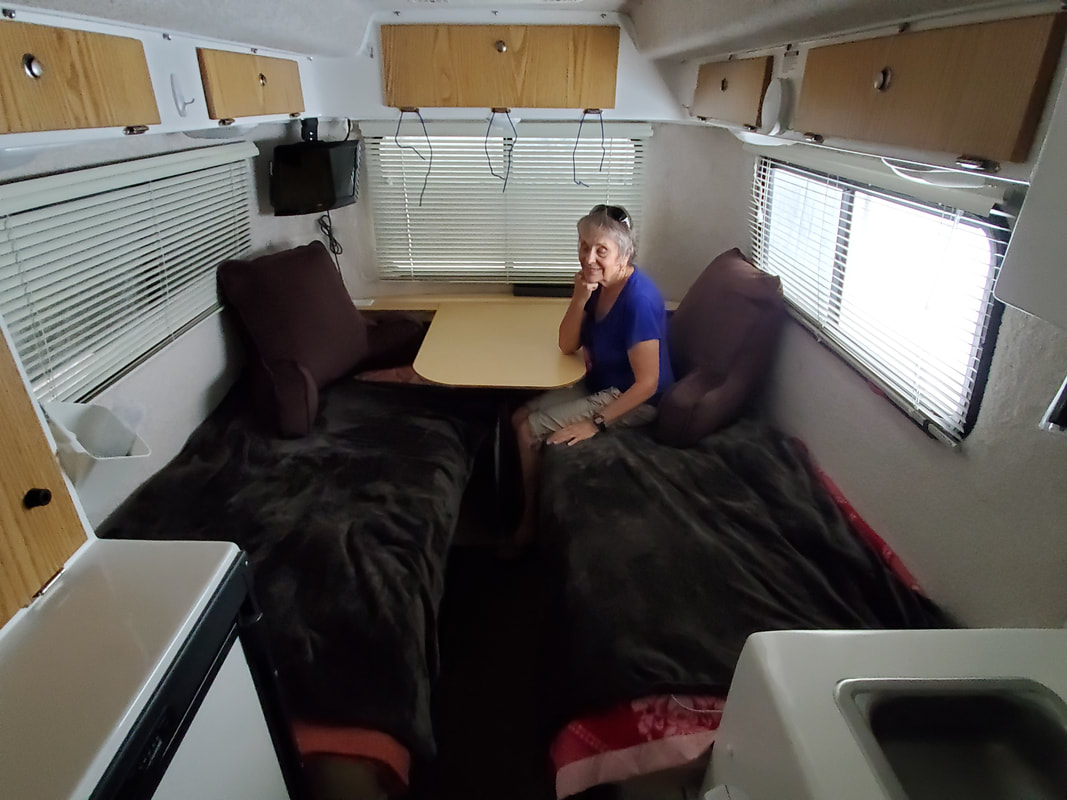
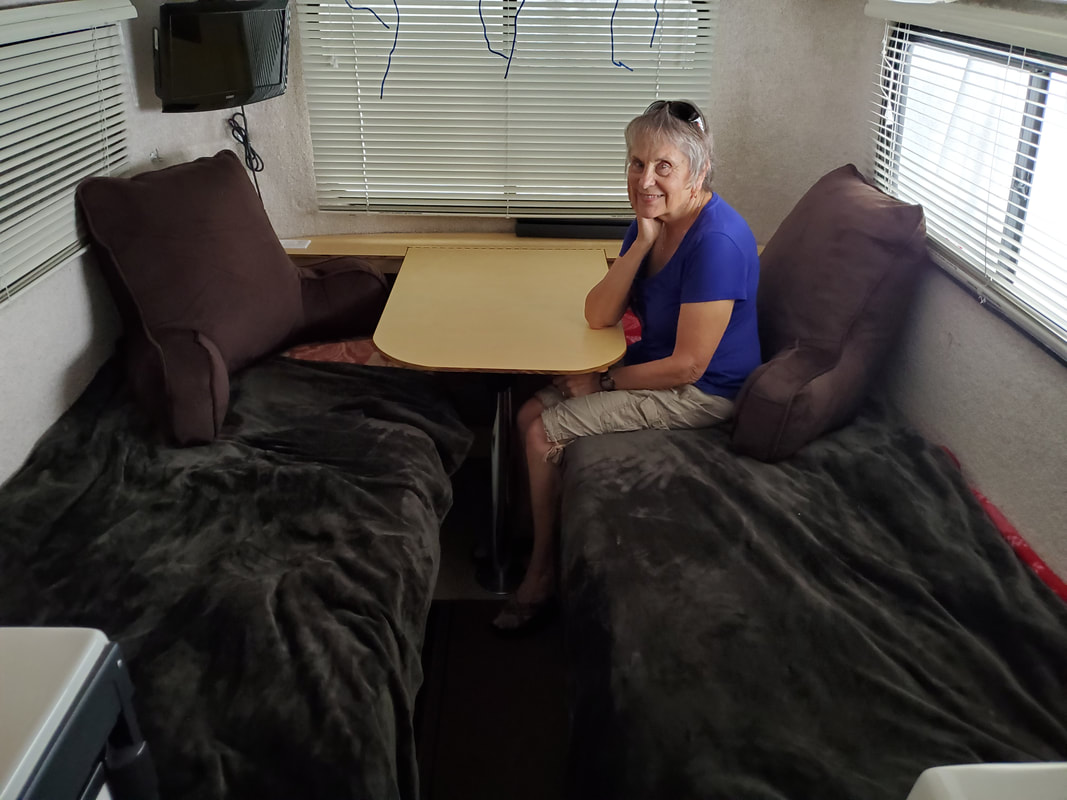
First is the frustration of inconvenience. There are 3 bed arrangements in a Liberty. A queen size bed, a king size bed, or twin beds. It all depends how you arrange the cushions. If you go queen, somebody is going to have to climb over the other person when he or she hears nature’s call. It is either that or the other person will have to get up also. If you go king size, then you have to play cushion roulette every day and night if you want to sit someplace other than the bed or if you want a table to eat on.
The second problem is comfort. Regardless of which of those 2 bed arrangements you use above, unless you do what most people seem to do - buy a memory foam topper to put over those cushions - you are going to be pretty miserable when trying to sleep. Those cushions are firmly stiff and uncomfortable. However, a topper will resolve the comfort issue, but it does nothing for the above inconveniences.
So after about 2 weeks of the above, we thought that going to the twin beds mode would solve the queen bed problem. It cleared up climbing over another person having to get up if you were the climbed over one, But on the first night of going twin, we were confronted with a new drawback - a 24” wide bed without a memory foam topper. Even if you had a topper, you are severely limited in movement and space and comfort still suffers severely. Though we stayed with the twin bed mode till we got home, It was only slightly better than the other options.
And that is why you will see “Twin Bed Modifications on a Casita Liberty Deluxe” in the forums.
Now, though you can find a few posts about those modifications in the Casita Forum and the Casita Club on the Internet, It is very difficult to get much information and see in detail the twin bed modifications that have been done to Casita trailers. When you do see one that you want to try to replicate, you won’t find many pictures of it. It will only be partial at best and not very close up either. The creators of their designs did not give many details of what they did or how they did it. Some of their posts are 13 years old or older. So you may not even be able to ask them any more either. Their ideas were posted on forums, and information on forums is notoriously brief. In general, forum people are often not writers who take the time to explain their ways. They assume; they don’t explain. If you intend to reproduce one of these good ideas, you will have to study the pictures a long time, enlarge them if you can, and make the best deductions that you can from those observations. What I am going to do here is give more precise data on some of those good twin bed mods. They apply specifically to just the Casita Liberty.
This article is going to be divided into 2 parts.
Twin Bed Modifications Only
I saw on the forums basically two bed modifications that I thought were workable. These are also the most popular since everyone seems to follow their lead. There just aren’t many ways to do this. Once the beds were modified most people declined to go much further than that. They had the beds, and they were mostly satisfied. Or they didn’t want to bother with the extra work involved in a little more customization. I am going to describe for you what most anyone can do by himself if all he wants is to make a better bed set up. It can be achieved by minimum tools if that is all you have. You will just need the following tools and materials:
Unless someone has come up with something I have not seen, there are presently only two possible twin bed modifications. I will describe each one first, and then I will give details following.
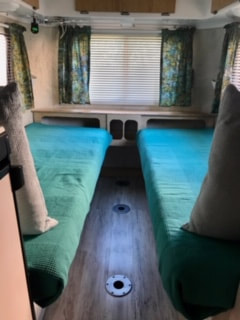
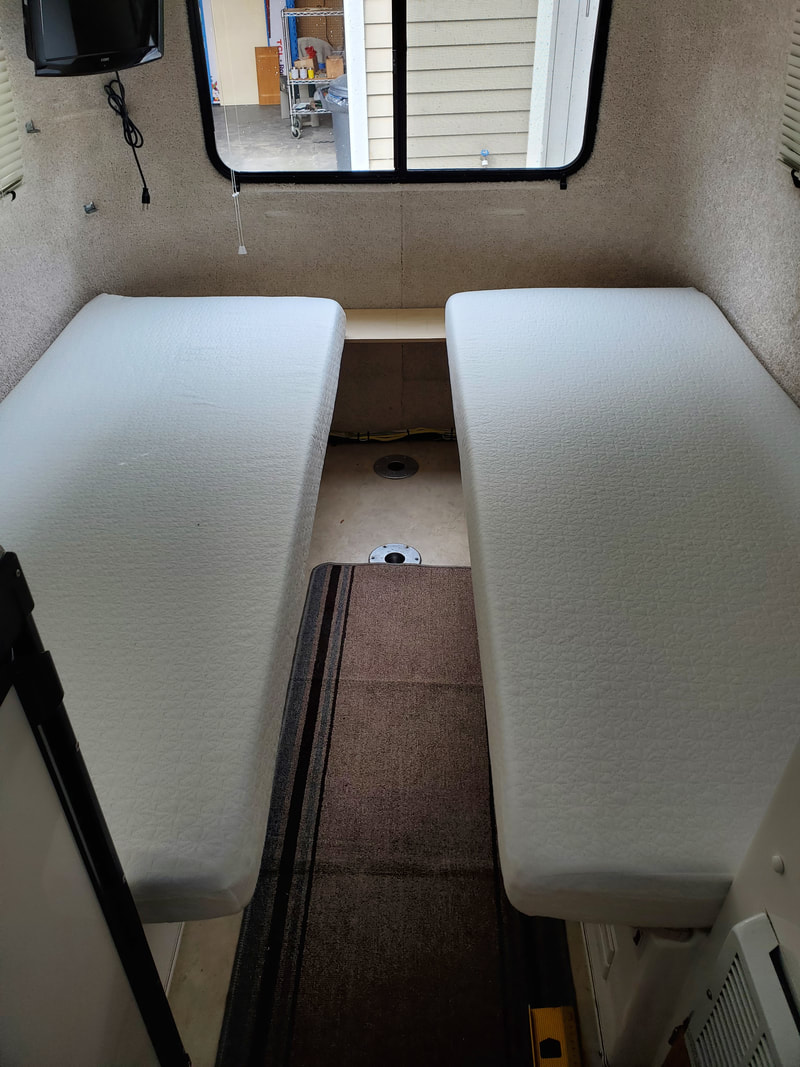
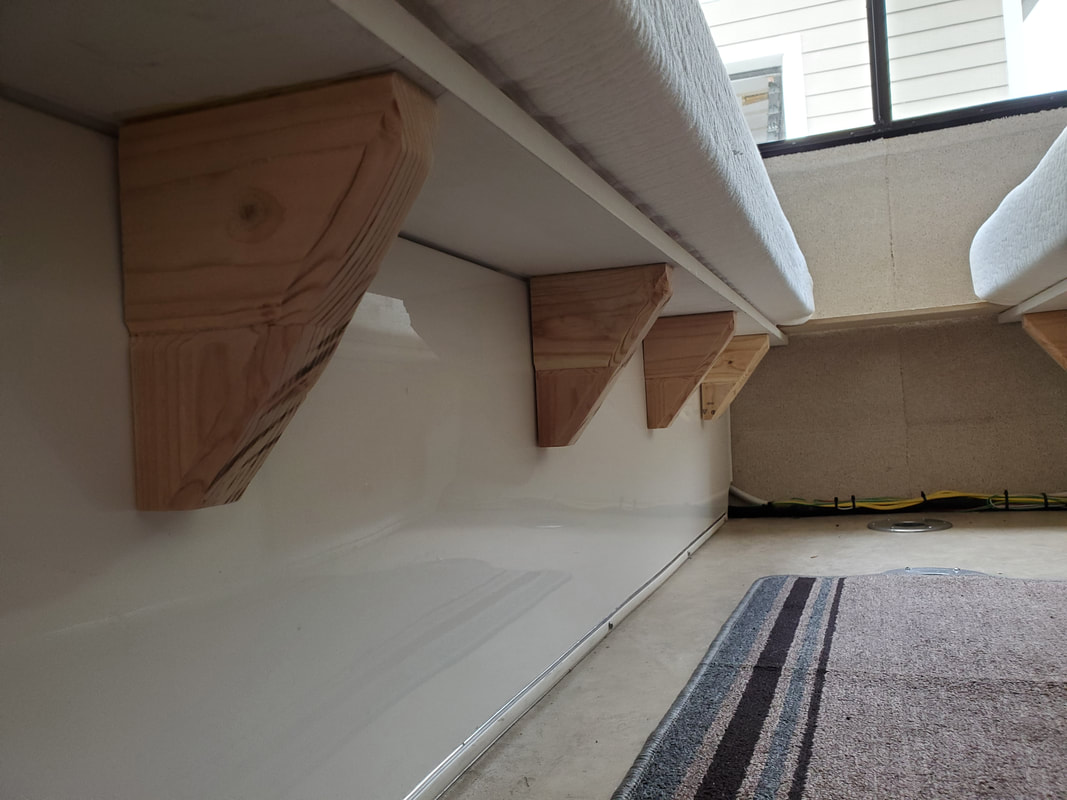
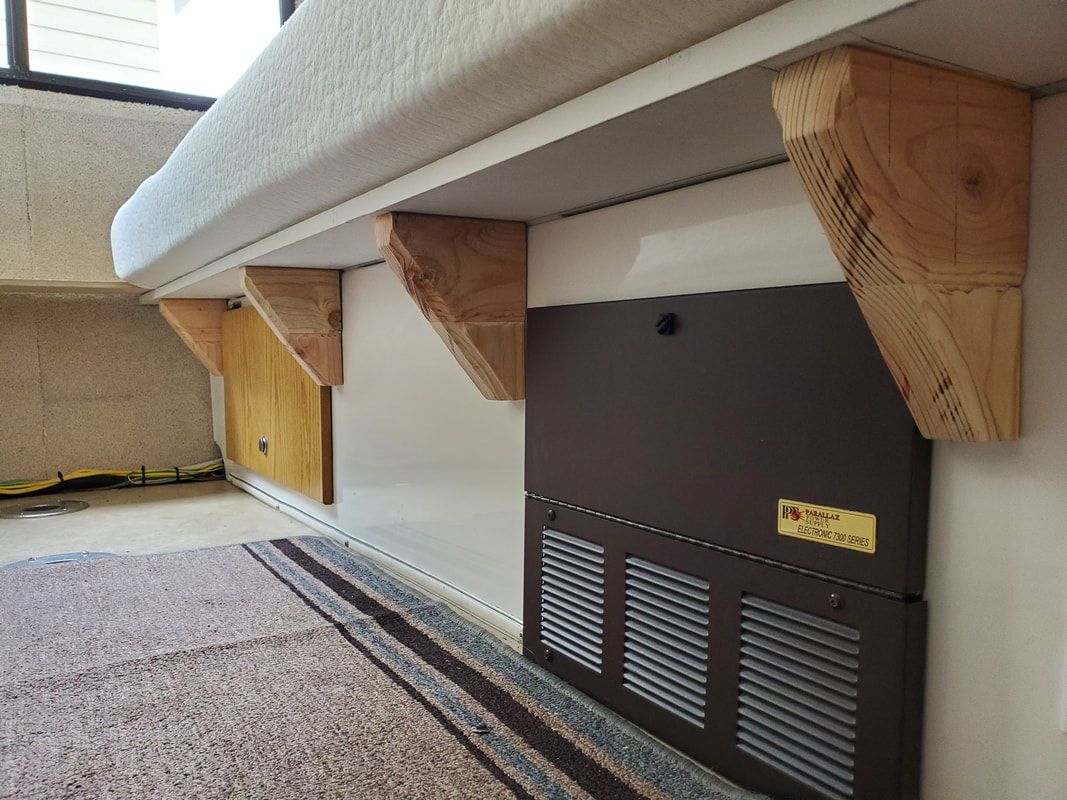
Modification #1. This is the easiest one and most efficient. You add two 1 inch x 8 inch x 8 foot shelves - supported by brackets - to each twin bed on the lip or ledge of the fiberglass bed platforms. On top of that you place two 6 inch memory foam mattresses, which you will buy from Amazon on the Internet. The link for those mattresses is further down. When completed, this is what it will look like.
First is the frustration of inconvenience. There are 3 bed arrangements in a Liberty. A queen size bed, a king size bed, or twin beds. It all depends how you arrange the cushions. If you go queen, somebody is going to have to climb over the other person when he or she hears nature’s call. It is either that or the other person will have to get up also. If you go king size, then you have to play cushion roulette every day and night if you want to sit someplace other than the bed or if you want a table to eat on.
The second problem is comfort. Regardless of which of those 2 bed arrangements you use above, unless you do what most people seem to do - buy a memory foam topper to put over those cushions - you are going to be pretty miserable when trying to sleep. Those cushions are firmly stiff and uncomfortable. However, a topper will resolve the comfort issue, but it does nothing for the above inconveniences.
So after about 2 weeks of the above, we thought that going to the twin beds mode would solve the queen bed problem. It cleared up climbing over another person having to get up if you were the climbed over one, But on the first night of going twin, we were confronted with a new drawback - a 24” wide bed without a memory foam topper. Even if you had a topper, you are severely limited in movement and space and comfort still suffers severely. Though we stayed with the twin bed mode till we got home, It was only slightly better than the other options.
And that is why you will see “Twin Bed Modifications on a Casita Liberty Deluxe” in the forums.
Now, though you can find a few posts about those modifications in the Casita Forum and the Casita Club on the Internet, It is very difficult to get much information and see in detail the twin bed modifications that have been done to Casita trailers. When you do see one that you want to try to replicate, you won’t find many pictures of it. It will only be partial at best and not very close up either. The creators of their designs did not give many details of what they did or how they did it. Some of their posts are 13 years old or older. So you may not even be able to ask them any more either. Their ideas were posted on forums, and information on forums is notoriously brief. In general, forum people are often not writers who take the time to explain their ways. They assume; they don’t explain. If you intend to reproduce one of these good ideas, you will have to study the pictures a long time, enlarge them if you can, and make the best deductions that you can from those observations. What I am going to do here is give more precise data on some of those good twin bed mods. They apply specifically to just the Casita Liberty.
This article is going to be divided into 2 parts.
- Twin bed modifications ONLY ( if you just want two comfortable beds and nothing more)
- Adding a headboard with more handy storage and a couple of advantageous electrical outlets. The link on how to put 2 electric receptacles in your headboard will be at the end.
Twin Bed Modifications Only
I saw on the forums basically two bed modifications that I thought were workable. These are also the most popular since everyone seems to follow their lead. There just aren’t many ways to do this. Once the beds were modified most people declined to go much further than that. They had the beds, and they were mostly satisfied. Or they didn’t want to bother with the extra work involved in a little more customization. I am going to describe for you what most anyone can do by himself if all he wants is to make a better bed set up. It can be achieved by minimum tools if that is all you have. You will just need the following tools and materials:
- Two 1 inch x 8 inches x 8 feet premium pine boards from Lowes or Home Depot or a lumber yard. Don’t buy knotty pine boards.
- 100 or 120 grit sandpaper
- A coping saw or jigsaw to round a corner on each of the two boards in #1 above. You could possibly eliminate this step if you do not have these tools or don’t want to mess with them. Or, you could sand them down to at least round them off a bit.
- 8 brackets you can buy at Lowes or Home Depot. Or you can make your own. (you will see pictures in the links below of the kinds of brackets people have bought and used. They are available anywhere.)
- Industrial velcro you can purchase at Lowes or Home Depot
You will also see in the links below that there have been a few people who have gone beyond just the bed mods alone and have added some kind of head board, cabinet, or shelf. Each of those requires some ingenuity and imagination because there is virtually no direction on what to do other than what can be gathered by a picture or two. You will also need more sophisticated tools than I listed above. But I will deal with those mods in the last section of this article and give you some measurements on what I did if you want to emulate something similar to what I have done.
Unless someone has come up with something I have not seen, there are presently only two possible twin bed modifications. I will describe each one first, and then I will give details following.
Modification #1. This is the easiest one and most efficient. You add two 1 inch x 8 inch x 8 foot shelves - supported by brackets - to each twin bed on the lip or ledge of the fiberglass bed platforms. On top of that you place two 6 inch memory foam mattresses, which you will buy from Amazon on the Internet. The link for those mattresses is further down. When completed, this is what it will look like.
If you don’t like the above design, then you can choose the modification below. Both of these options will have further links so you can view them from various angles and make your own choice.
Modification #2. You cut a piece of MDF (medium density plywood) or plywood to lay over the twin bed fiberglass platforms. The plywood will extend out past the edge of each bed making a 30” wide bed which is covered with a memory foam mattress. Now, it just so happens that there are two variations to this approach. So if you decide to go this way, pick one of the two below.
- Some just lay a whole piece of plywood over the fiberglass, covering the lids to the storage areas below. If you want to reach the storage areas beneath them, then you must lift the mattress and the plywood to gain access.
- Others will place oblong cut outs in the plywood around the lids so that they have access to the areas under the beds. This way you only have to lift the mattress, not the plywood as well, to get into those areas. But . . . if you want to use the plywood technique without sawing cutouts in the plywood, then you could do what others have done, which is to attach hinges to the plywood and to the fiberglass about 5 inches from the walls of each bed. So whether you cover the lids with the plywood or you cut around the lids, you can lift both the mattress and the plywood at the same time by hoisting the hinged plywood. Since the hinge joint is 5” or so from the wall, the mattress should slip into the 5” or space while you are holding it all up or lock it in place with a prop. Here are a few pictures below of people who have used both these mod methods that will help explain what I mean in both examples above:
http://www.casitaclub.com/forums/topic/4578-twin-bed-modification-on-liberty/
http://www.casitaclub.com/forums/topic/11197-liberty-twin-beds/
http://www.casitaclub.com/forums/topic/20507-liberty-twin-bed-dimensions/
http://www.casitaclub.com/forums/topic/20231-various-bed-options-and-table-up/page-3?hl=%2Btwin+%2Bmods#entry177184
http://www.casitaclub.com/forums/topic/17157-enhanced-bed-arrangements-for-liberty-17ft/
As I read and studied these 2 ways to mod the twin beds and why each was used, I came up with 7 goals I wanted to achieve in all I wanted to do with my whole project.
- I wanted to avoid a lot of extra weight. It was pointed out that adding just the plywood for the bed’s foundation would add about 90 pounds to the trailer’s weight.
- I did not want to drill any holes in the fiberglass. That ruled out the hinges.
- I wanted to make these bed mods as inexpensively as possible. That eliminated the plywood and Modification #2.
- I wanted a headboard where I could store the things in my pockets at night, like a wallet, keys, chapstick, flashlight, knife, phone, Kleenex box, etc.
- I wanted a more convenient way to charge my cell phone than by plugging it into the only outlet next to the sink or on the floor by the closet or up by the TV. I will provide step-by-step detail on how ANYONE can do this in a headboard without danger. It will increase the value of your Casita and also make it more useful to you. The link to that modification is below.
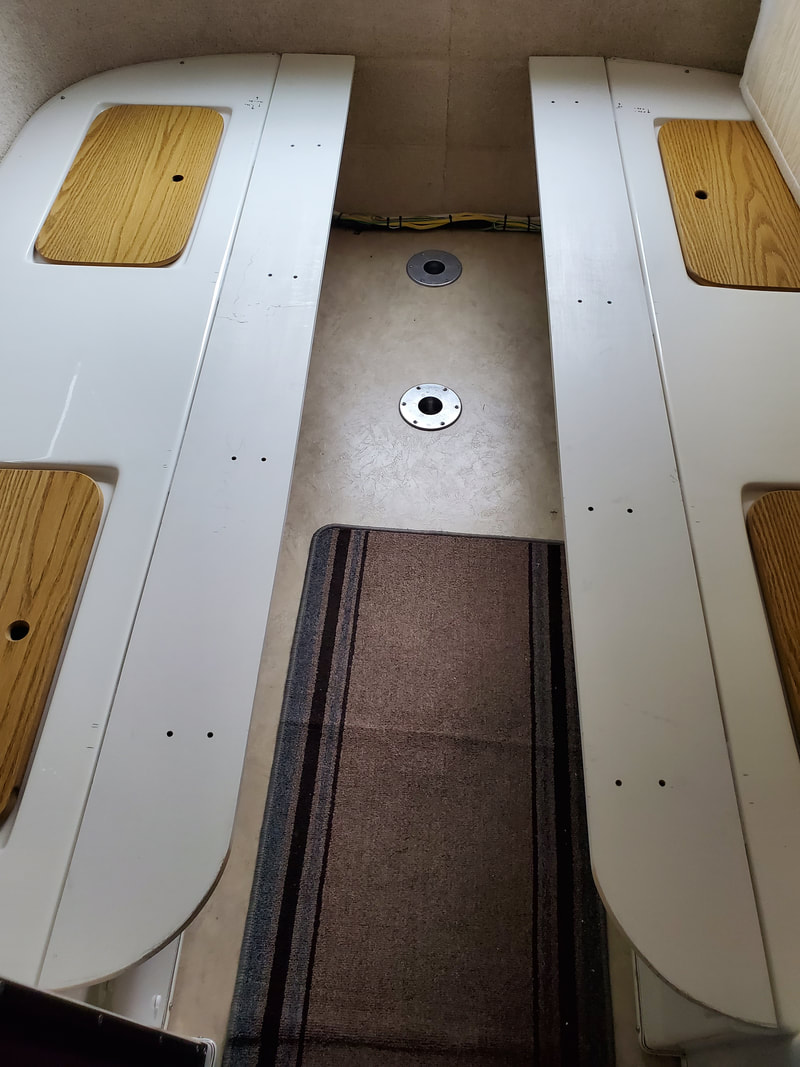
- I wanted to get rid of, once and for all, another irritating feature in a Casita, those blasted metal tubes in the middle of the floor that hold up a table top and are constantly obstructive and clanging around looking for a place to be stored. So I would have to design a headboard that incorporated a dining table that could be lifted up and out of the way when we were not eating and then lowered and suspended without a metal tube in the floor when we needed a table. (More about that at the end of this article.)
- When the day came for me to sell the Casita, I wanted to make it as easy as possible to convert it back to its original form in case the person I sold it to preferred one of the other bed configurations that Casita had designed for the Liberty Deluxe. And if he did, I didn’t want him or her thinking I had altered or diminished it from its original condition.
Therefore, I chose Modification #1, adding 2 shelves supported by brackets.
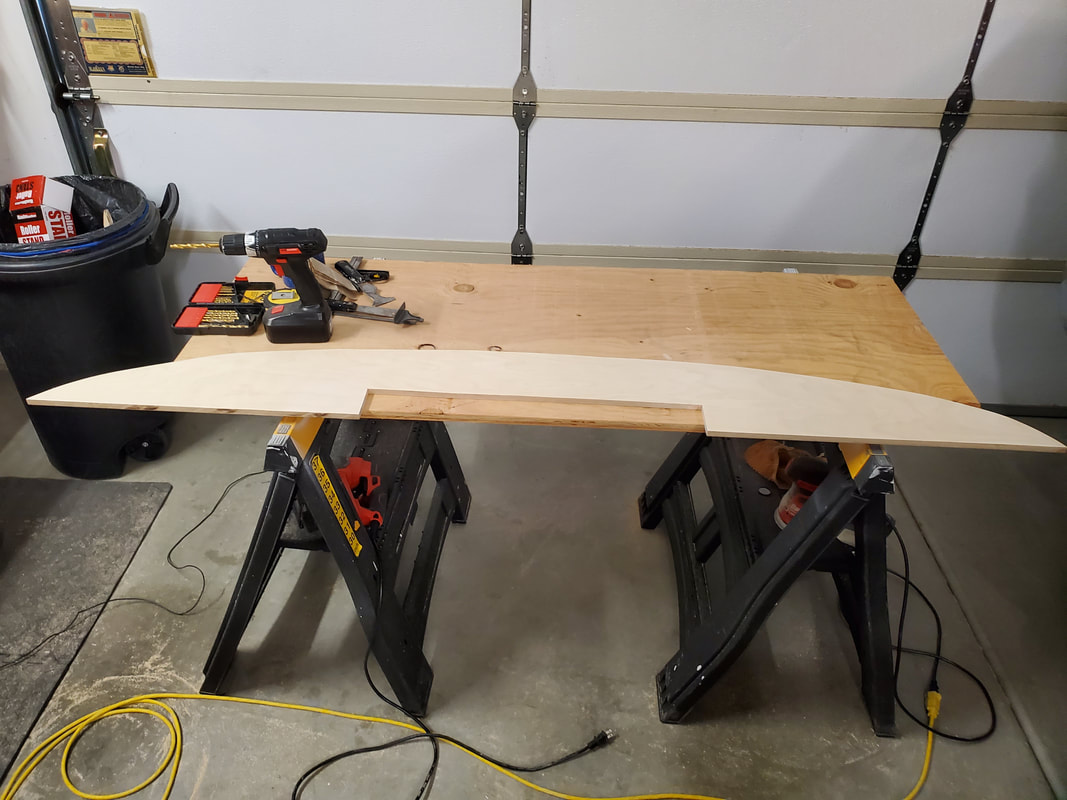
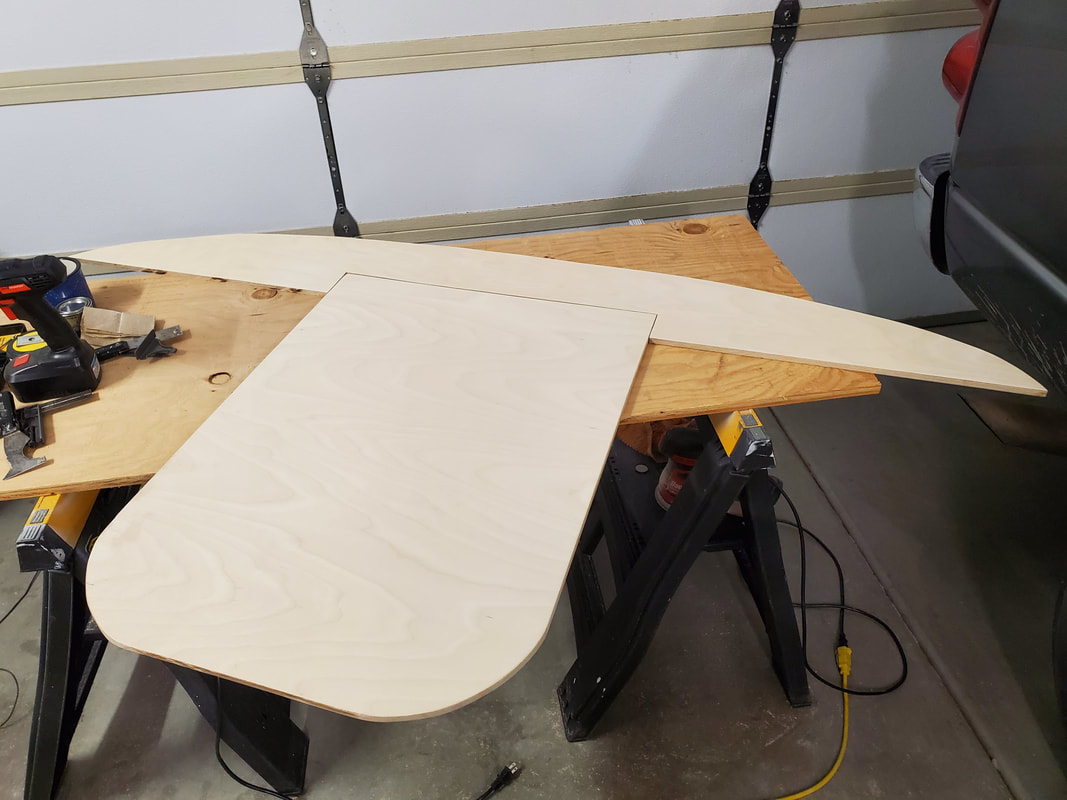
So here is what I did. First, I removed the cushions and measured the length of the bed area, which was 82 inches. From Lowes I bought two 1 inch x 8 inches x 8 feet premium pine boards that had been primed white for $8.96 each. I used the Casita large dining table as a template for rounding off the ends of each board. The 2 boards cost $17.92.
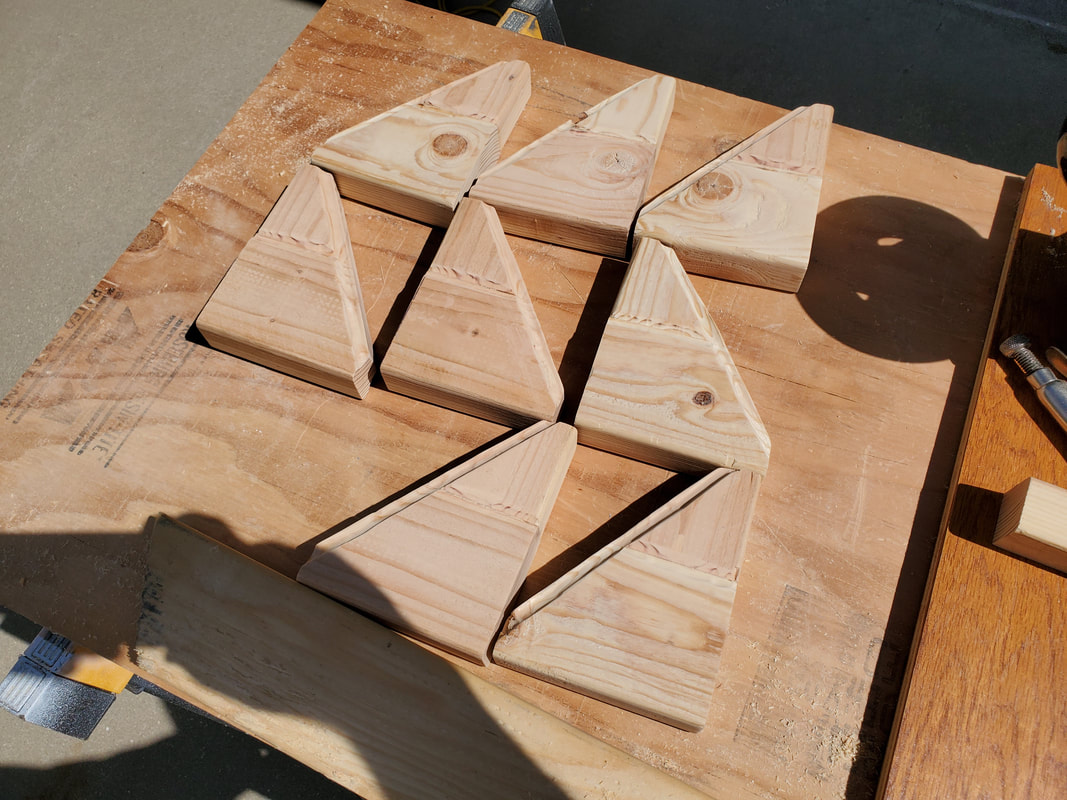
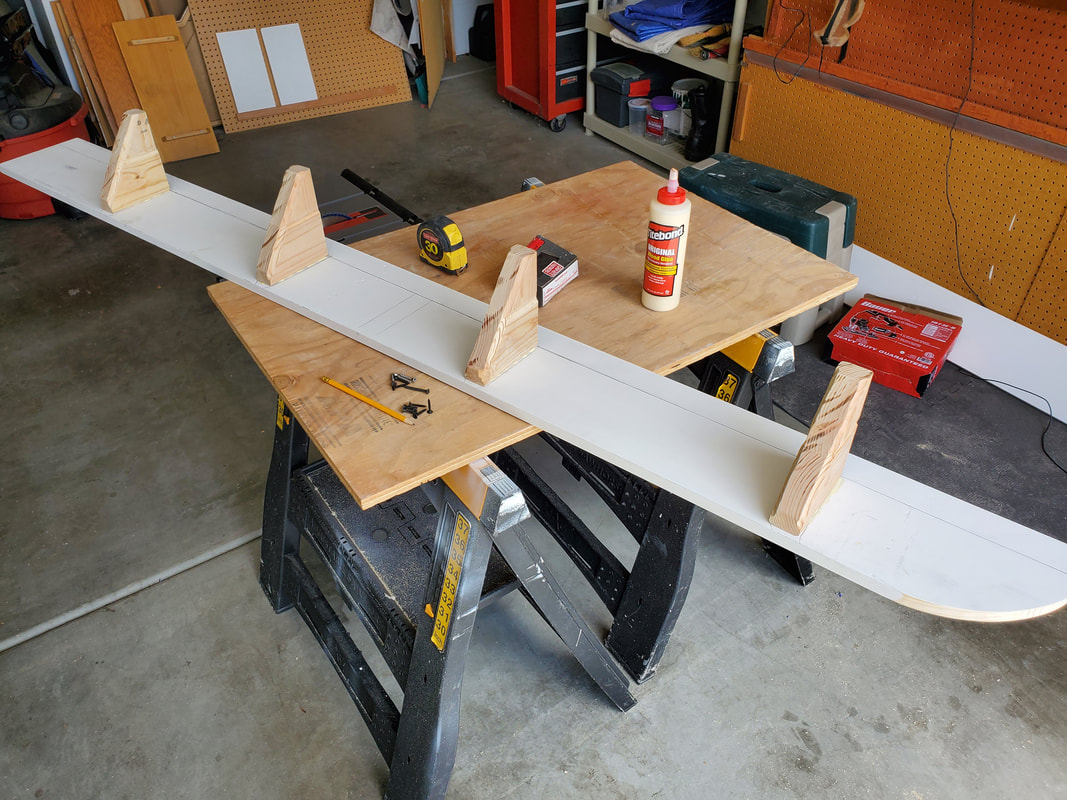
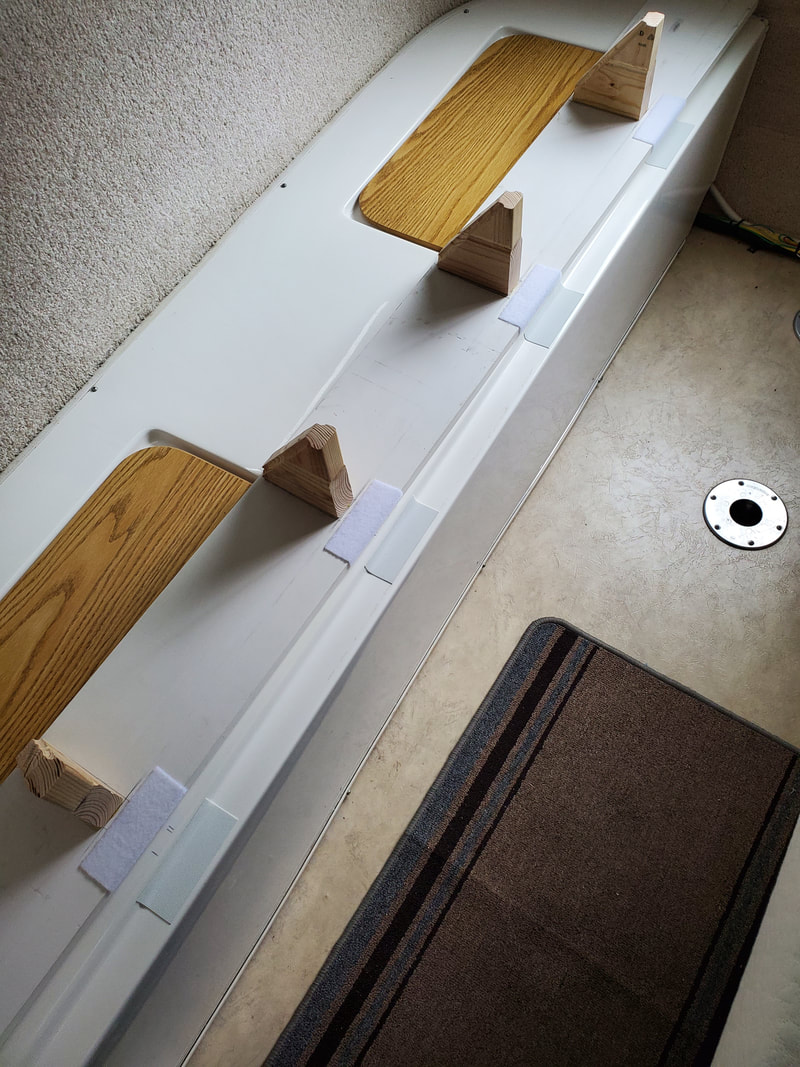
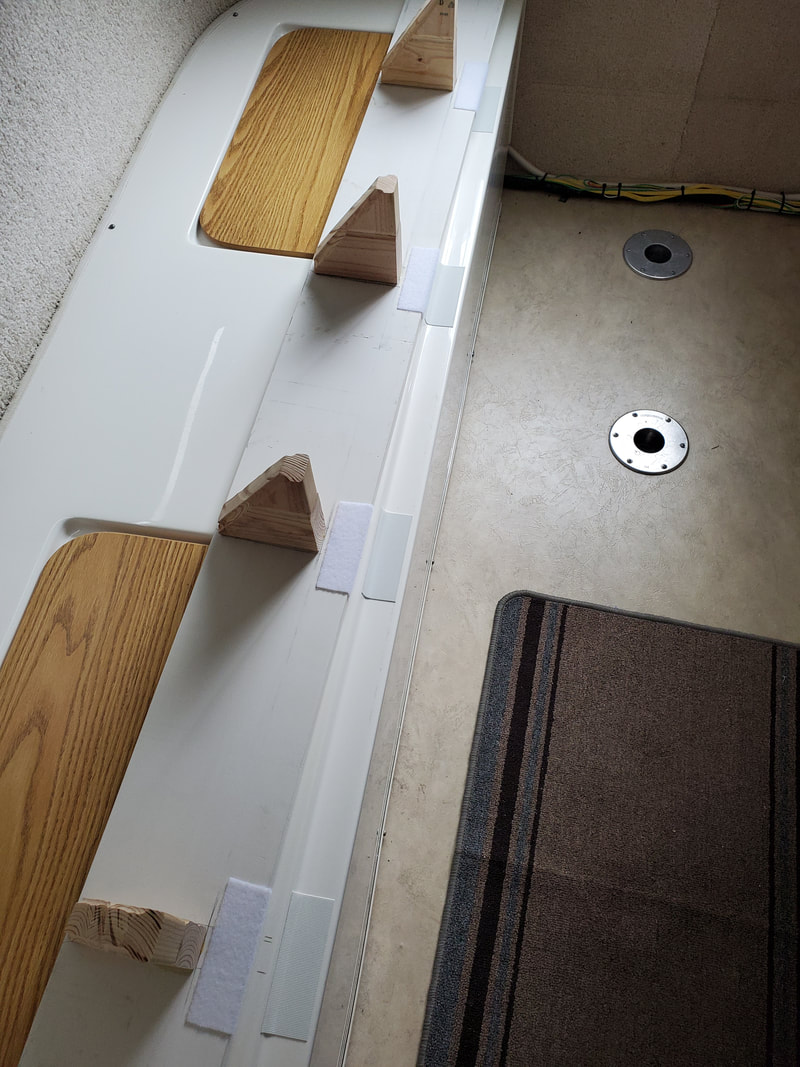
After I used the large dining table to make a template for rounding the corners of the pine boards, I had to come up with brackets to suspend the boards from the lip or ledge of the fiberglass beds. You can either buy them or make them. Links below will show you what brackets were used when they were bought. People who posted in the forums extended their bed platforms to 30” and used 3 brackets to support the bed. I only read about one man who used 4 brackets. I decided 4 were better than 3. Most were fancy metallic brackets from of Lowes or Home Depot. I did not want to pay the price for those metal brackets. Nor did they look substantial enough to me. So I made 8 brackets of my own from one nice straight eight foot long 2x4 that I had. The brackets I made were 4 inches x 5 inches. Pictures are below. Each bracket was made up of 2 pieces of 2x4 glued together. They were rough looking. But almost anything looks a lot better after you run a router over it. Those did too. I did not paint them because no one would see them anyway. I glued the brackets together and later glued them to the boards first and then screwed them to the boards afterwards with 2 screws to insure they would not come apart, using a counter sink bit. The screws can be seen in the second picture above.
I spaced the brackets so they would not interfere with opening the doors on the side of the storage cabinets beneath the beds and placed them at the following locations. Measuring from the end of the bed board at the refrigerator end of the door-side, I put a bracket on the underside of the bed board at 12", 30.5", 48", and 66". Measuring from the end of the board on the non-door sink-side, I spaced the brackets under the bed board at 10", 27", 45.5", and 76.5".I also measured how far out from the lip of the fiberglass bed each bracket should be when it sat against the vertical side of the fiberglass wall. See the picture.
You will see in the link below that one man, using this same method, used the expensive tape instead of velcro. I am not sure if he put the tape down the length of the whole lip or whether he used foot long strips. In any case, he used far more than I did. And mine held like iron.
http://www.casitaclub.com/forums/topic/20507-liberty-twin-bed-dimensions/
In 1. above about the expensive tape, you will see that the man who used the expensive tape applied it to both sides of his black brackets. He used it to stick his bracket to both the fiberglass and the underside of the board. I attached no velcro to the vertical bracket supports since the weight of the mattress pressed against the fiberglass and would not allow the board to move. And since I had glued and screwed the boards to my homemade wooden brackets, I did not need to attach the boards to the brackets with velcro either.
From Amazon we ordered 2 Zinus Green Tea 6-inch Memory Foam Mattresses Narrow Twin (30 in x 75 in) for $64.45 each, and that completed the twin bed modifications. Some people on the forums spent a lot of money to have mattresses custom made for them. Some were 8” thick. But these 6" mattresses are comfortable and probably all most people will need for a very good price. They are now $65.99 as of 5/30/2020, the day I am writing this. So we will store those Casita cushions till we sell the trailer one day. Here is where to find the mattresses we bought.
https://www.amazon.com/s?k=Zinus+Green+Tea+6-inch+Memory+Foam+Mattresses+Narrow+Twin&ref=nb_sb_noss
The total cost for this twin bed modification was:
$128.90 for 2 memory foam mattresses
9.28 for industrial Velcro
17.92 for two 1 in x 8 in x 8 ft premium pine boards
______0 for brackets
$156.10
Before I leave this section, I am going to give Honorable Mention to a gentleman who came up with a variation of the method I used. I can see some merit in this because he has made a way to give more room to the upper body of both sleepers. The lower portion of the body would not need as much room. This is a very practical solution.
https://www.casitaforum.com/invboard/forums/topic/26596-twin-beds-mod-in-the-isopod/?tab=comments#comment-273364
Adding a Headboard With More Handy Storage and a Couple of Advantageous Electrical Outlets
The following description of what I built was inspired by an amalgamation of the following modifications found at these 2 links:
http://www.casitaclub.com/forums/topic/20507-liberty-twin-bed-dimensions/
http://www.casitaclub.com/forums/topic/20231-various-bed-options-and-table-up/page-3
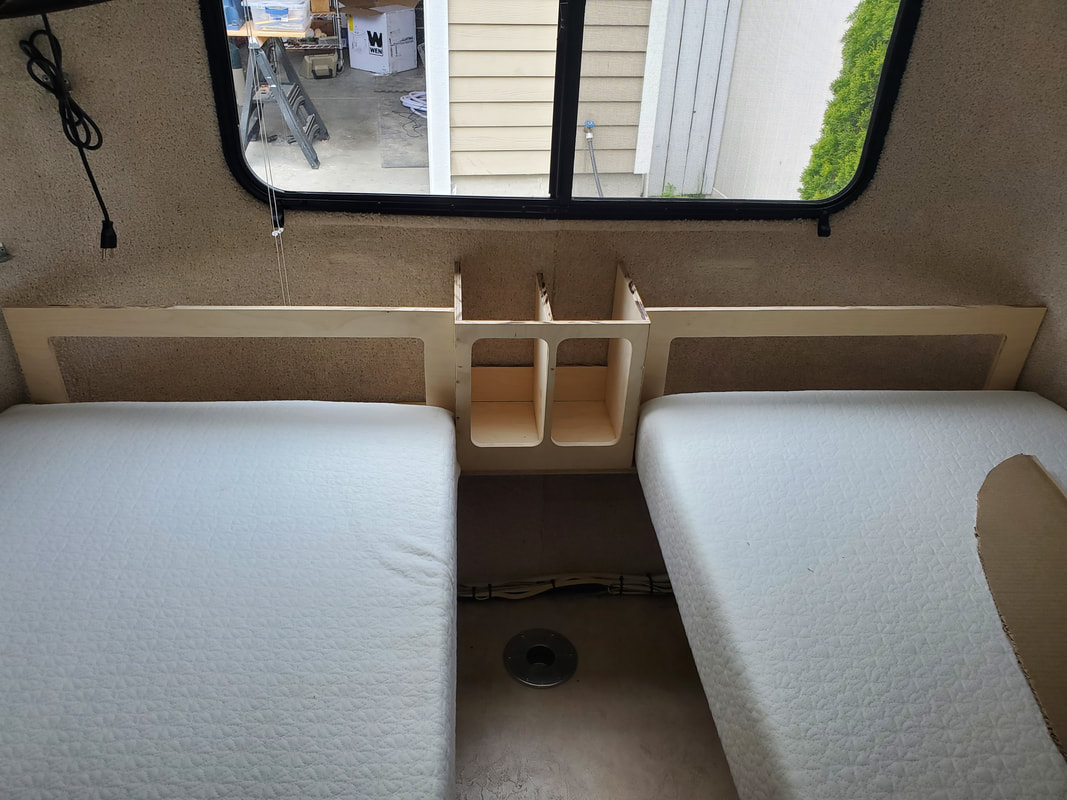
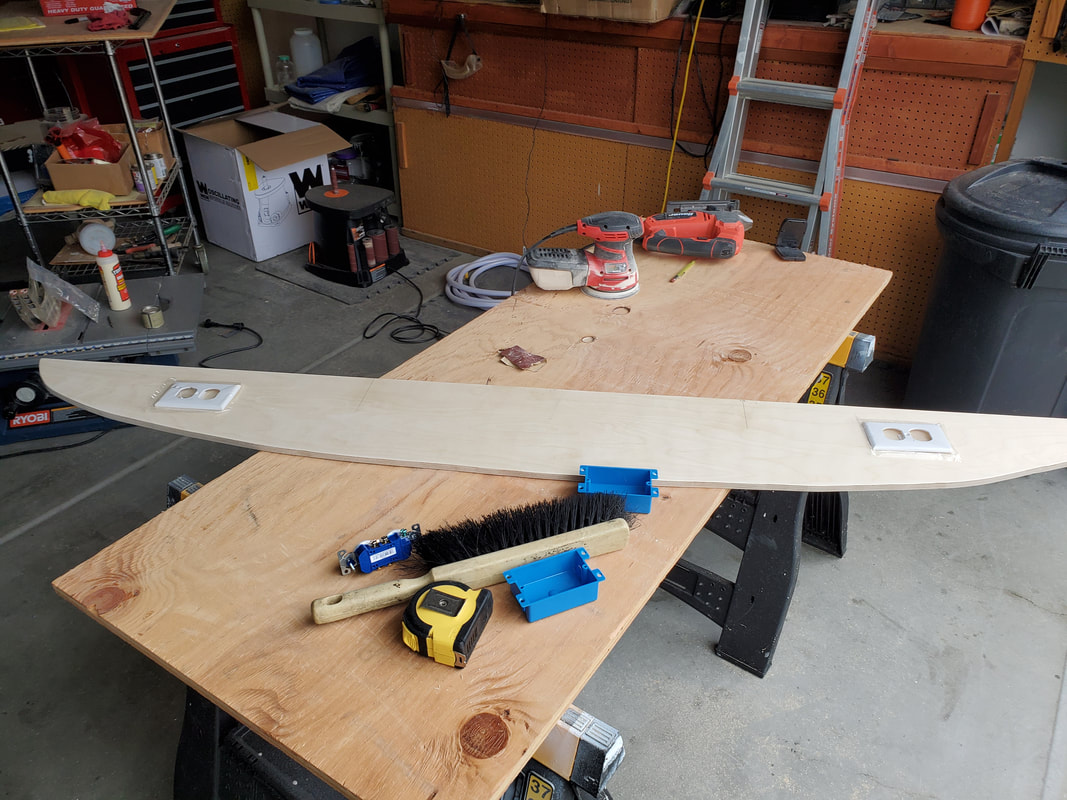
Since I now had the mattresses installed, I now knew how much room I had left to build the headboard. From the top of the mattresses to the back of the Casita, there was about 9 inches. I measured the distance across the top from side to side, which meant that I was going to have to create a template so I could snugly fit one piece of 1/2 inch plywood into the round corners and across the aisle.
That piece of plywood was purchased from a place that specialized in many different types of hardwood plywood. I chose Baltic Birch because there are no voids in it. It cost $48.41 for a 4x8 sheet. They gave me all the hardwood screws I needed to glue and screw it.
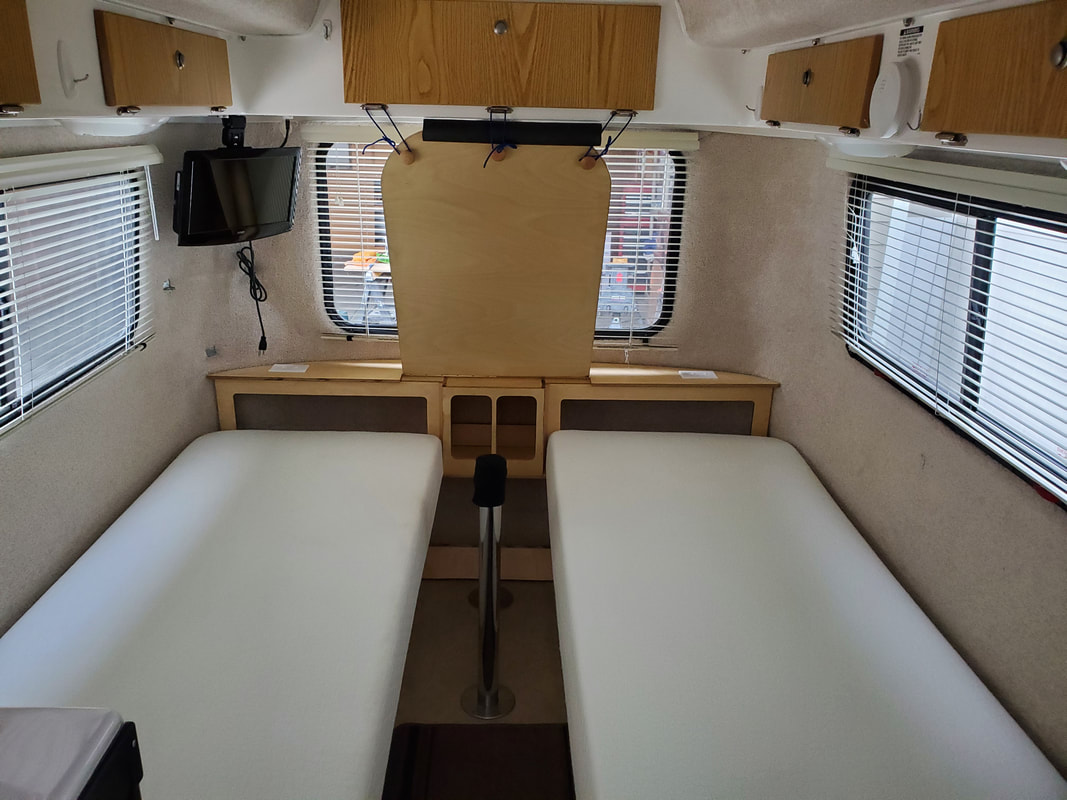
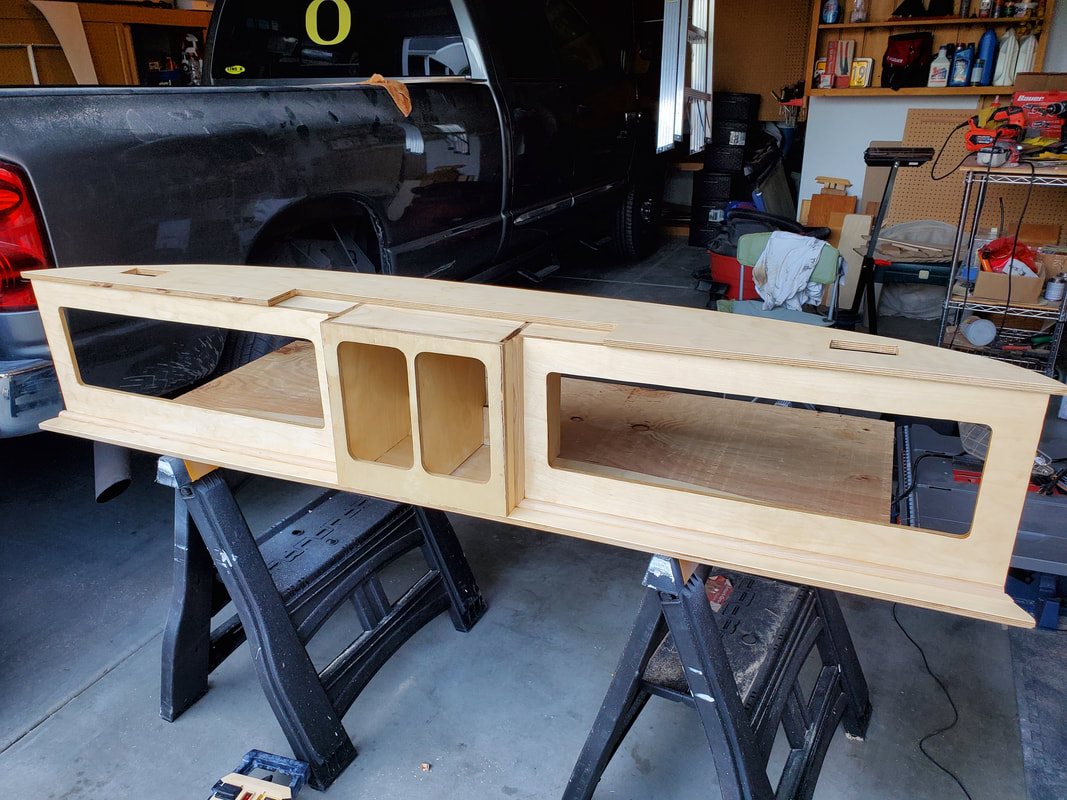
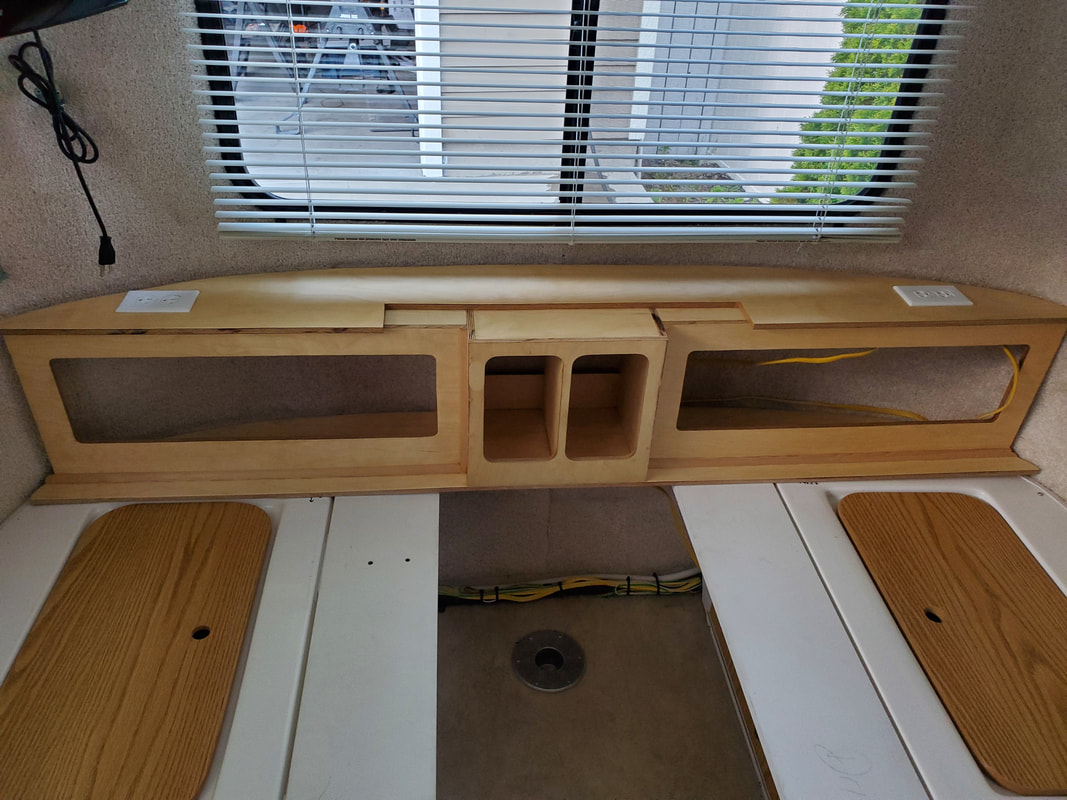
From the plywood I made the entire headboard and the drop down table that would be the same height as the table that Casita had supplied with the metal post.
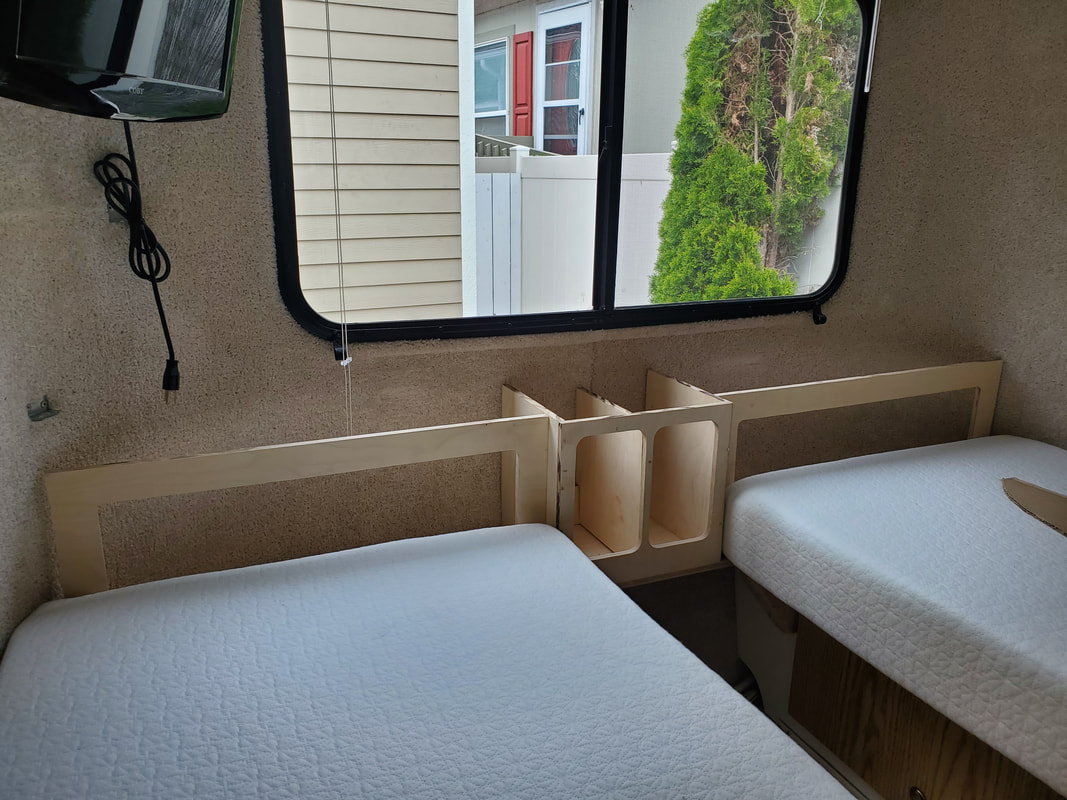
I constructed 3 boxes. The center one was a 13 inches wide x 11 7/8 inches high x about 9 inches deep. It sits between both mattresses, extending out into the aisle about 2 inches to keep the ends of the mattresses positioned on the bed extensions I had just built. The 13 inch box is divided into 2 side by side compartments - one for Linda and one for me - to store whatever we wanted in there at night.
On either side of the center box, I built a 11 7/8 inches high x 28 inches wide x 8.5 inches deep box for another storage hole for other things.
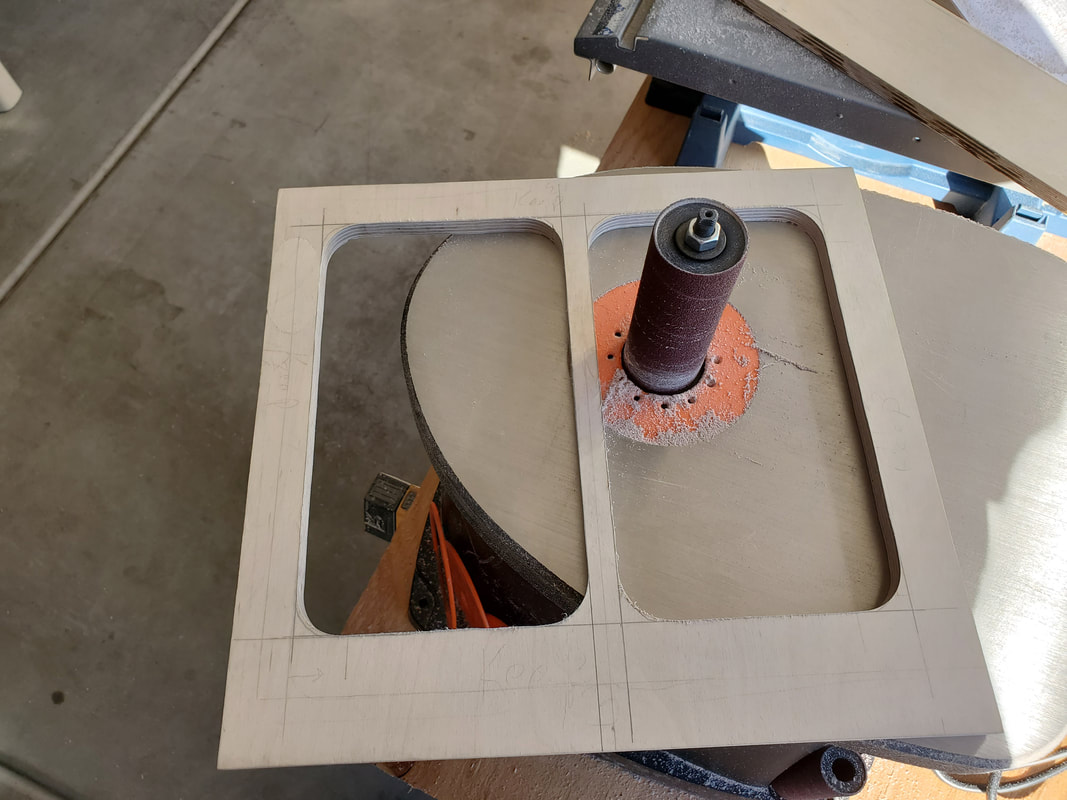
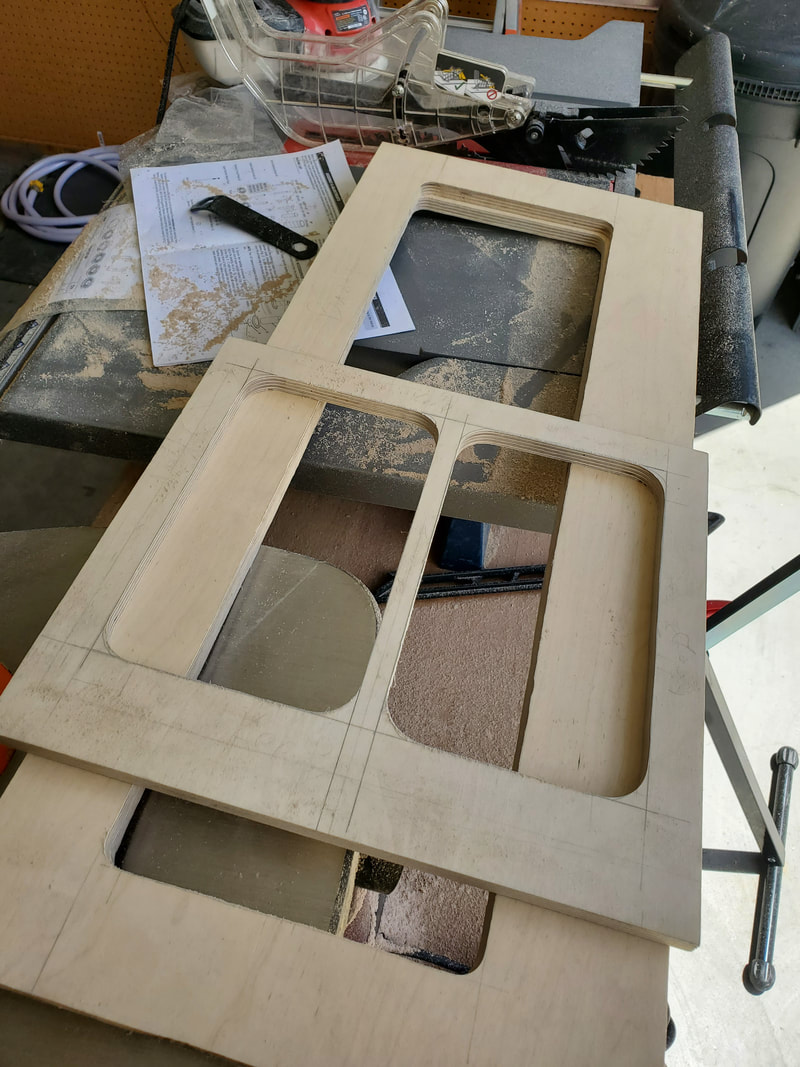
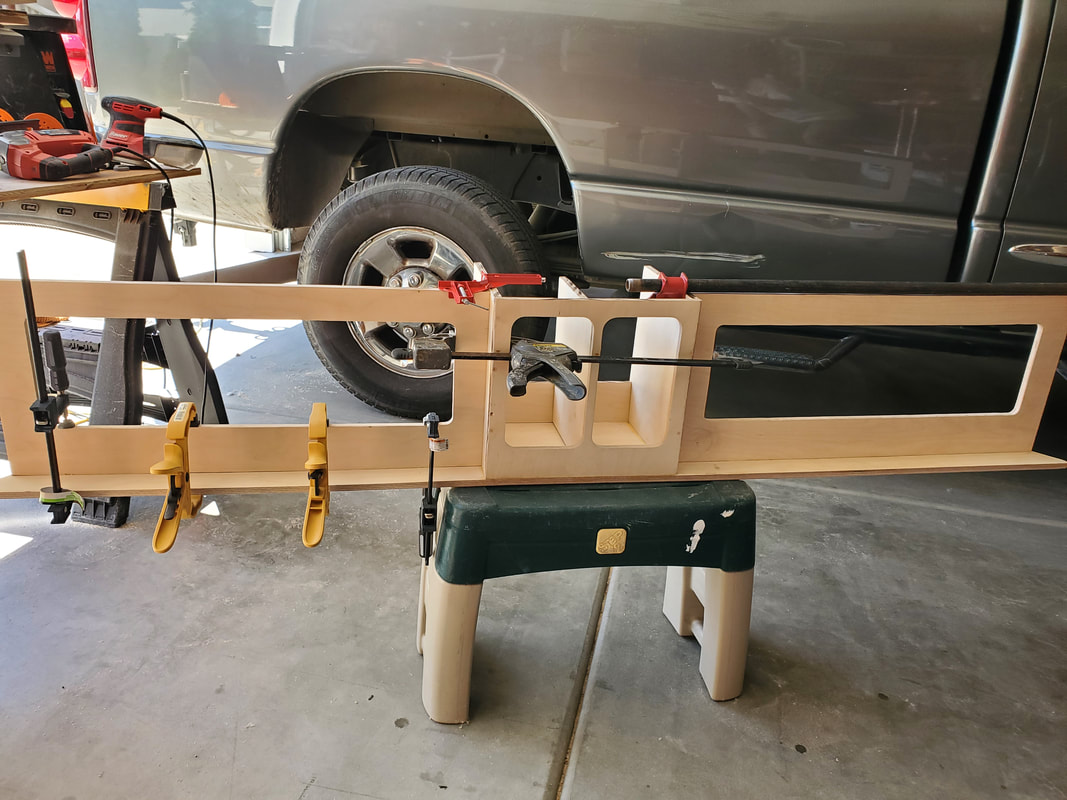
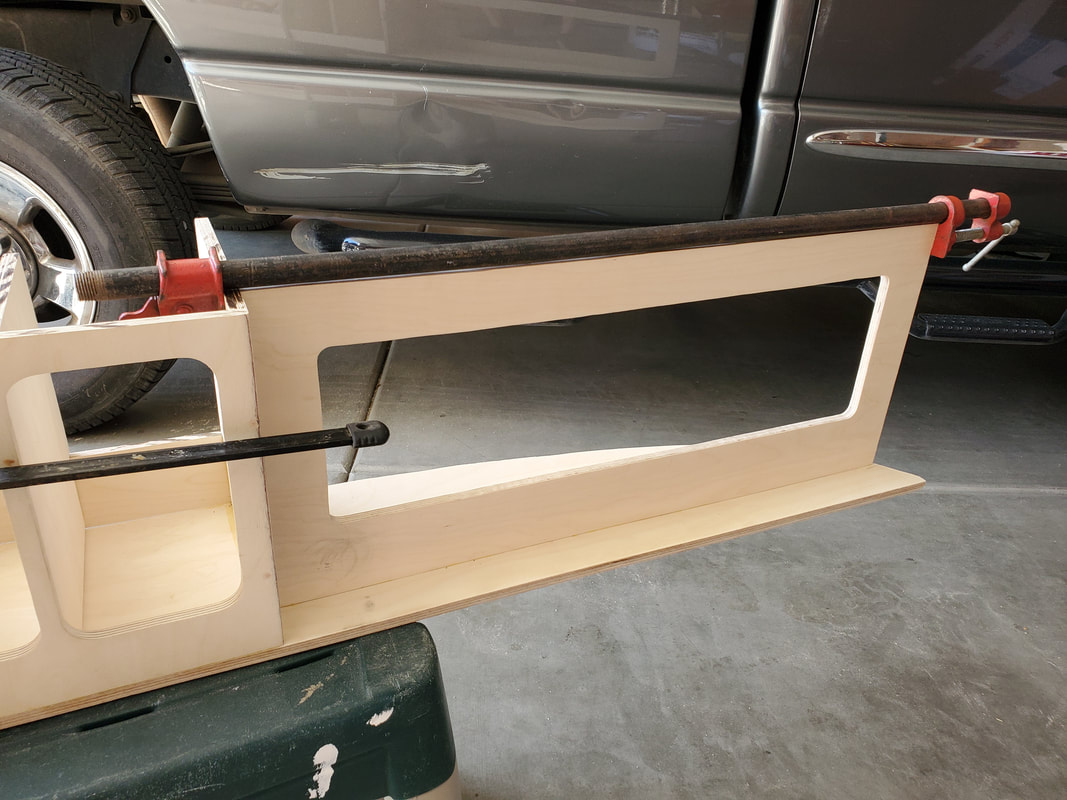
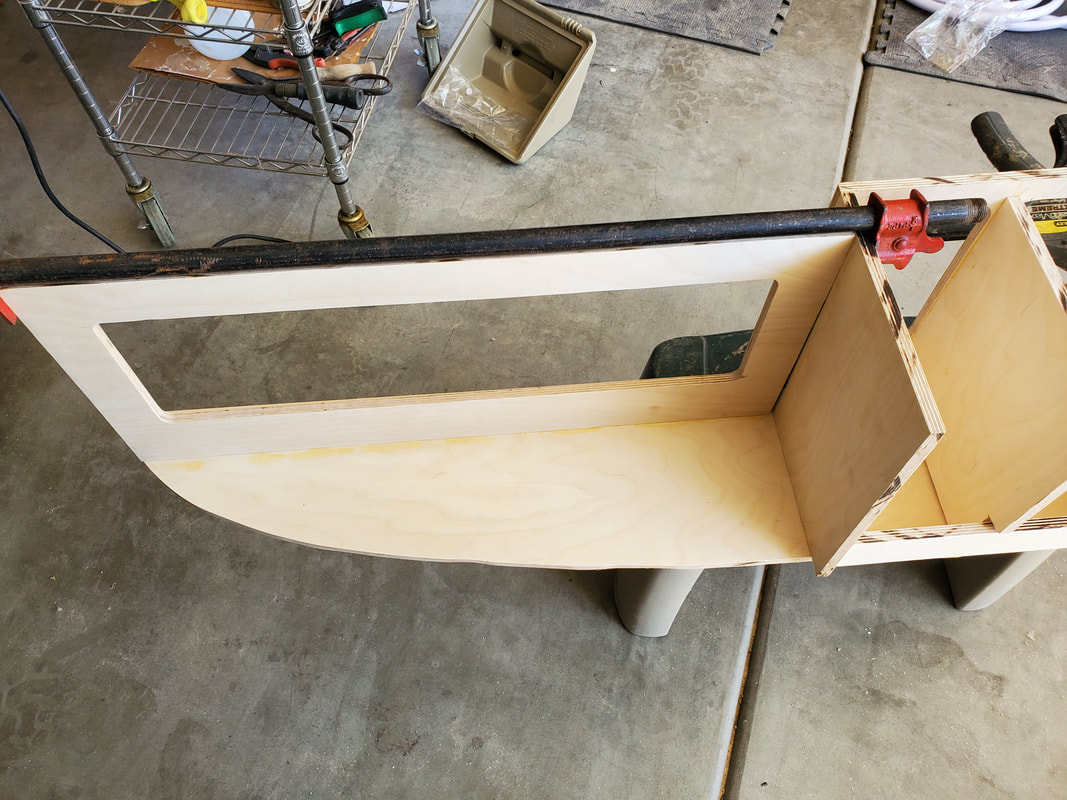
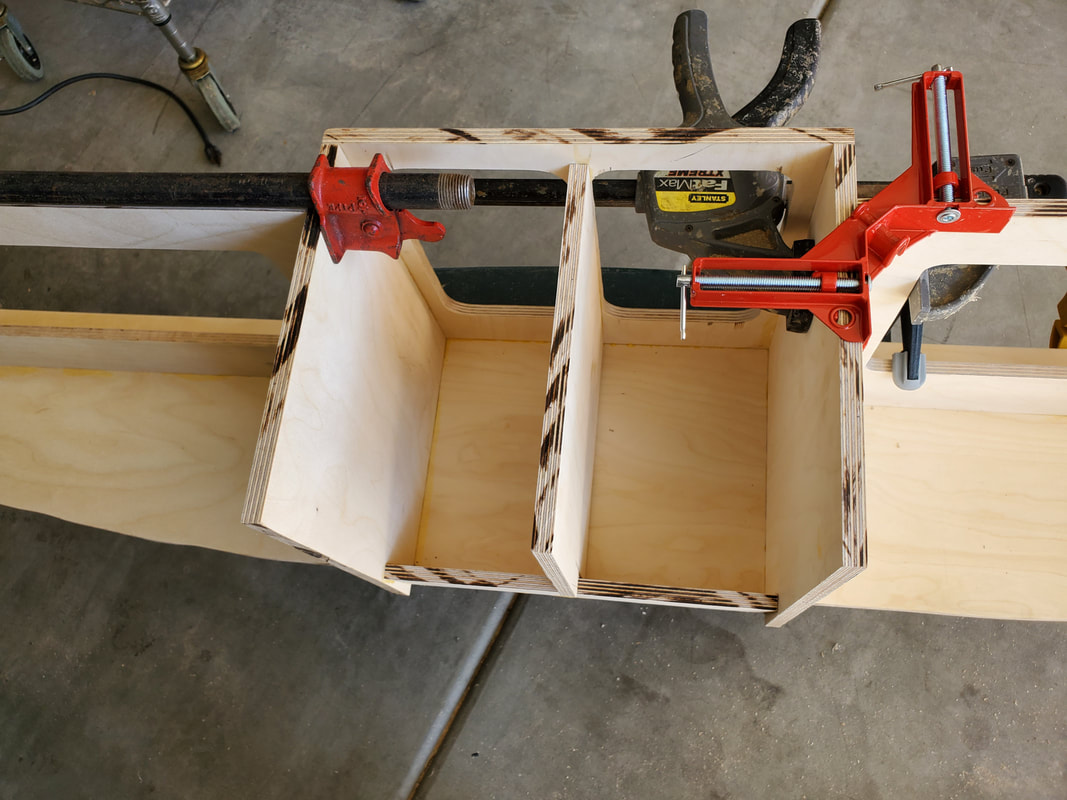

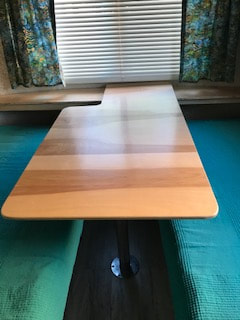
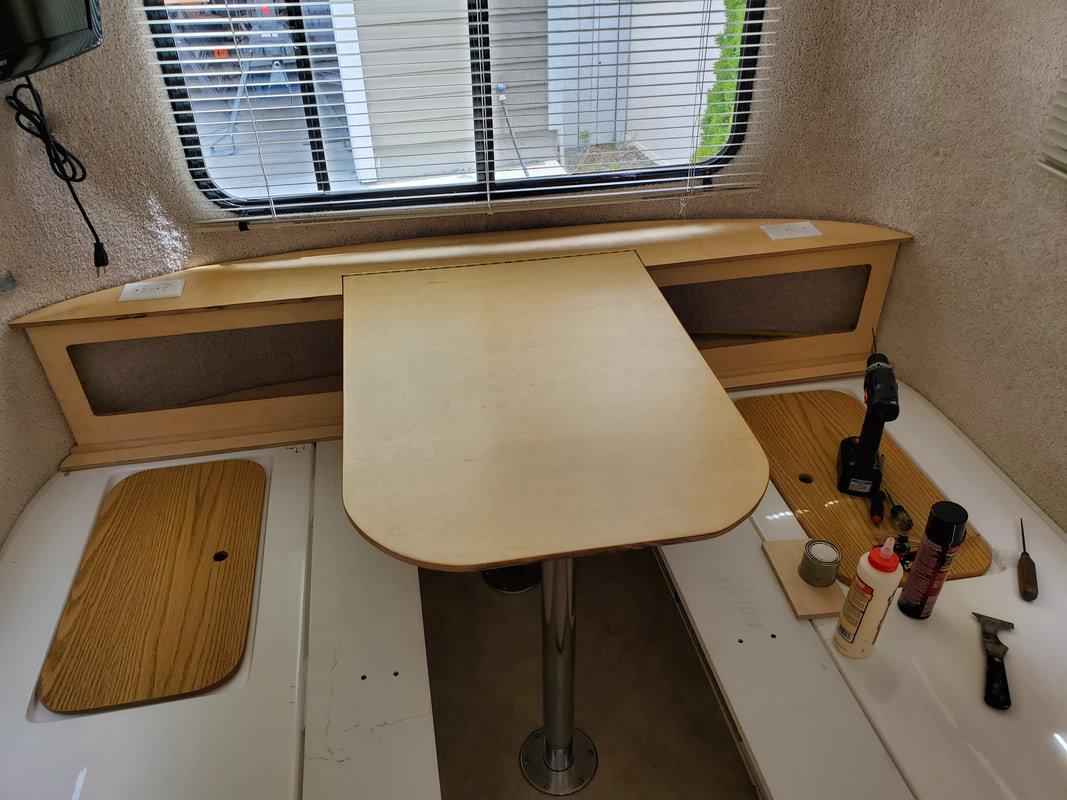
I made another template and covered all 3 boxes with a top shelf into which toward the ends I installed 2 electrical outlets for charging cell phones and computers.The link to easily adding a couple of electrical outlets is below. A 3 inch x 24 inch portion of the top shelf was cut out and replaced by a 24 inch x 33 inch dining table top that was attached to piano hinges, which contained 24 screws to keep it securely in place. The end of the table top that was attached to hinges, when it was lowered, was supported by and rested on top of the middle box as well as the two boxes beside it. The weight of the table was not carried by the hinges alone. Originally I was going to make a pole or brace to support the table in the down position, but when I put one of the metal Casita poles into the middle slot, it was the exact height I needed and just so happened to be located in the right position to support the table. The practicality of doing that overwhelmed making a separate support. Although I am using one of the Casita poles, it is ONLY ONE and very easy to store. At least now I don't have to lift that huge Casita dining table and wonder where to put that thing at night and then hoist it again in the morning. It will stay home. Linda made a cushioned cap for the metal pole so that it doesn't scratch the underside of the table. All this is in the pictures below.
Before placing the headboard into the Casita, I put 3 coats of Emmet's Good Stuff Wood Finish (https://www.amazon.com/Wood-Welded-Emmets-Stuff-Finish/dp/B0000DD2S2) on the table top and 1-2 coats elsewhere.
Before placing the headboard into the Casita, I put 3 coats of Emmet's Good Stuff Wood Finish (https://www.amazon.com/Wood-Welded-Emmets-Stuff-Finish/dp/B0000DD2S2) on the table top and 1-2 coats elsewhere.
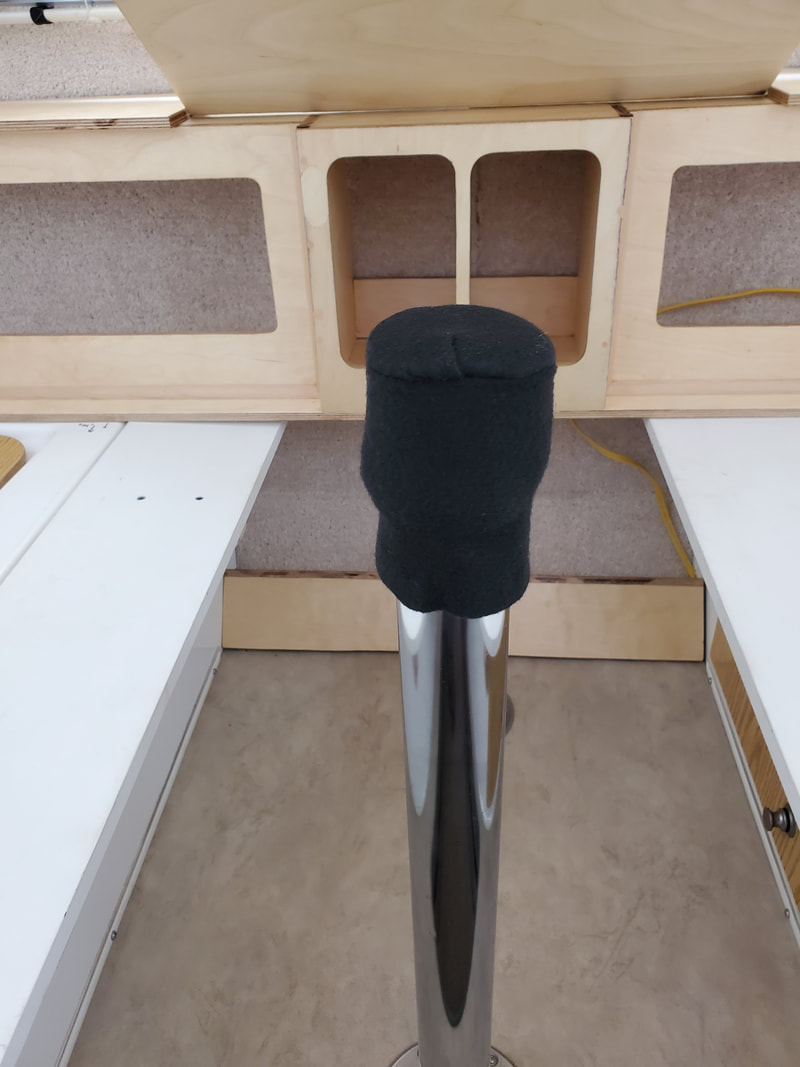
I glued 3 wooden door knobs to the underside of the dining table and attached 3 paracord loops around the three hinges on the upper middle compartment storage area. Not professional, but it works well. A strip of foam pipe insulation around the end of the table will prevent it from being marred when it is in the up position against the storage cabinet above. The 3 paracord loops will each be tied around the three door knobs to suspend the dining table when not in use. This is seen in the picture below.
While I was at it, I made a new cover for the wires on the floor at the back of the trailer instead of that cover supplied by Casita. You can see that cover in the picture above and below.
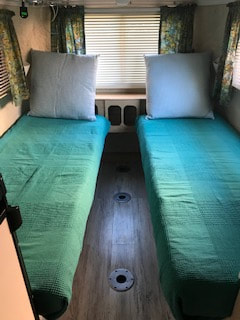
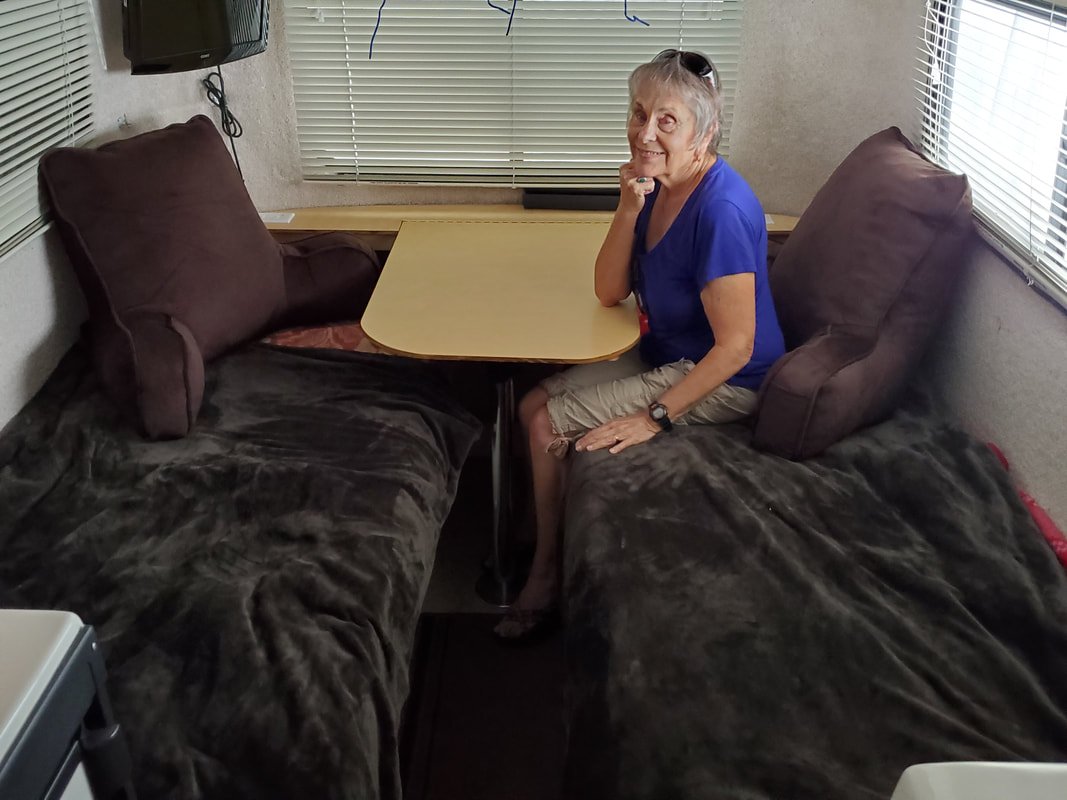
I removed 5 heavy bed and table boards, including the shelf under the TV, and stored those. We added a couple of electric blankets and 2 bed back rests from Bed Bath & Beyond, and I want to tell you that this Casita has really become very comfortable and much more versatile with a lot more room and storage space.
How To Add a Couple of Electrical Receptacles To Your Casita Deluxe Twin Bead Headboard Modification
As promised, here is the link to complete instructions and pictures on how to add 2 electrical receptacles to your modified headboard if you want to make the final and one of the most useful modifications of all. These instructions will show you how to add another circuit to your Casita no matter what you want to use it for, but in this case it is specifically written and designed for adding 2 electric receptacles to the Casita Liberty Deluxe Twin Bed Headboard modification. I wrote this so that ANYONE can do it. There is no guessing, no confusion, and no danger. It is simply explained with step by step instructions.Those who got as far as the modification I made and think they are incapable of doing this or are afraid to mess with electricity will now make yourself and your wife even more happy with your Casita, and you will increase its value and saleability by hundreds of dollars. In addition, you will learn some things about your Casita that may not have known. Click the link below:
Add Electric Outlets to Headboard
While I was at it, I made a new cover for the wires on the floor at the back of the trailer instead of that cover supplied by Casita. You can see that cover in the picture above and below.
I removed 5 heavy bed and table boards, including the shelf under the TV, and stored those. We added a couple of electric blankets and 2 bed back rests from Bed Bath & Beyond, and I want to tell you that this Casita has really become very comfortable and much more versatile with a lot more room and storage space.
How To Add a Couple of Electrical Receptacles To Your Casita Deluxe Twin Bead Headboard Modification
As promised, here is the link to complete instructions and pictures on how to add 2 electrical receptacles to your modified headboard if you want to make the final and one of the most useful modifications of all. These instructions will show you how to add another circuit to your Casita no matter what you want to use it for, but in this case it is specifically written and designed for adding 2 electric receptacles to the Casita Liberty Deluxe Twin Bed Headboard modification. I wrote this so that ANYONE can do it. There is no guessing, no confusion, and no danger. It is simply explained with step by step instructions.Those who got as far as the modification I made and think they are incapable of doing this or are afraid to mess with electricity will now make yourself and your wife even more happy with your Casita, and you will increase its value and saleability by hundreds of dollars. In addition, you will learn some things about your Casita that may not have known. Click the link below:
Add Electric Outlets to Headboard


If you have questions, let me know. I have not provided exact measurements on the headboard. They may not exactly fit your Casita anyway because I don’t know if they are all created with the same exact dimensions. But what I have provided will be close enough to save you all the trouble I had trying to figure it all out.
Eventually I will put a video here and on YouTube. You can contact me through the form at the bottom of this page.
Lastly, I have included 4 pictures below of another gentleman's project who followed my plan but added a unique table.
Eventually I will put a video here and on YouTube. You can contact me through the form at the bottom of this page.
Lastly, I have included 4 pictures below of another gentleman's project who followed my plan but added a unique table.